Creating and Adding To a Scenario
This article shows how to create a scenario and how to add projects or assignments to a scenario. It also shows what scenario records look like on the affected pages.
Create a Scenario
Step1: Go to the Project Data page in Grid mode.
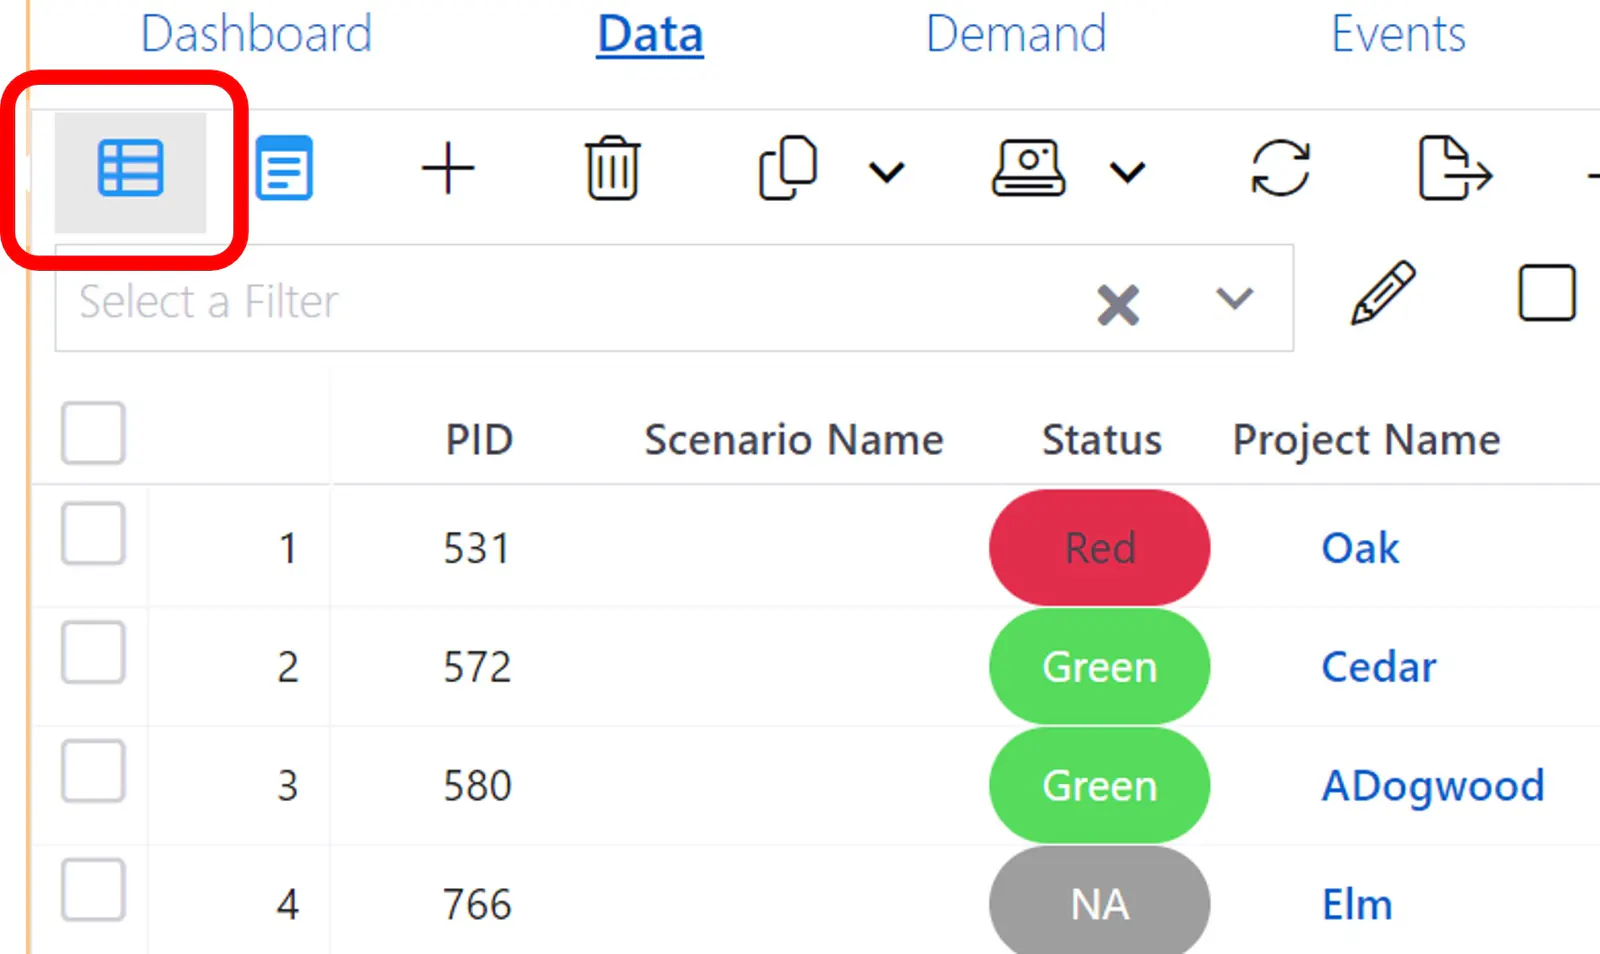
Step 2: Select one or more projects using the checkboxes on the left.
Step 3: Click the Baseline, Status, Scenario & Templates icon in the upper left page toolbar icon group.
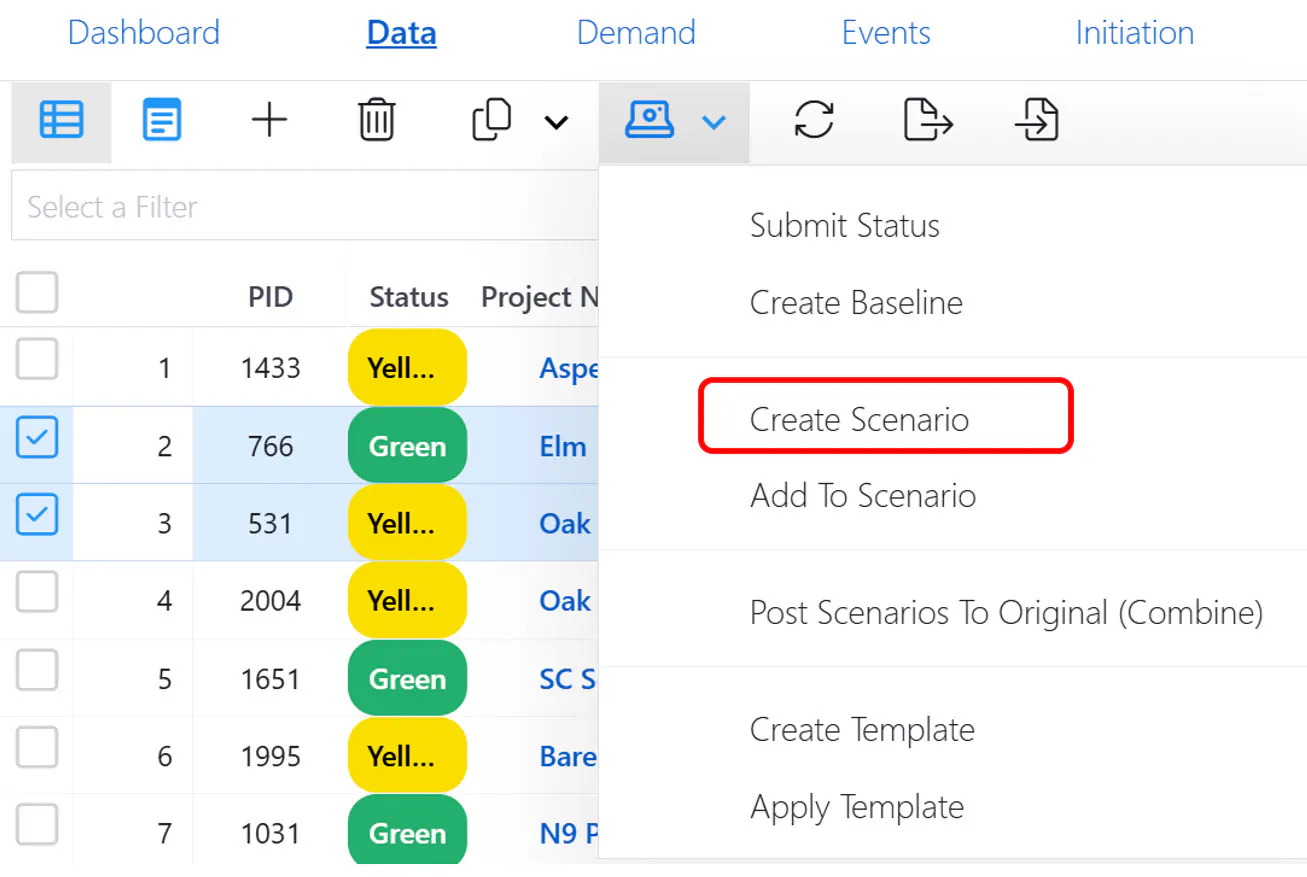
Step 4: Click Create Scenario to launch the Create Scenario dialog and enter scenario attribute values.
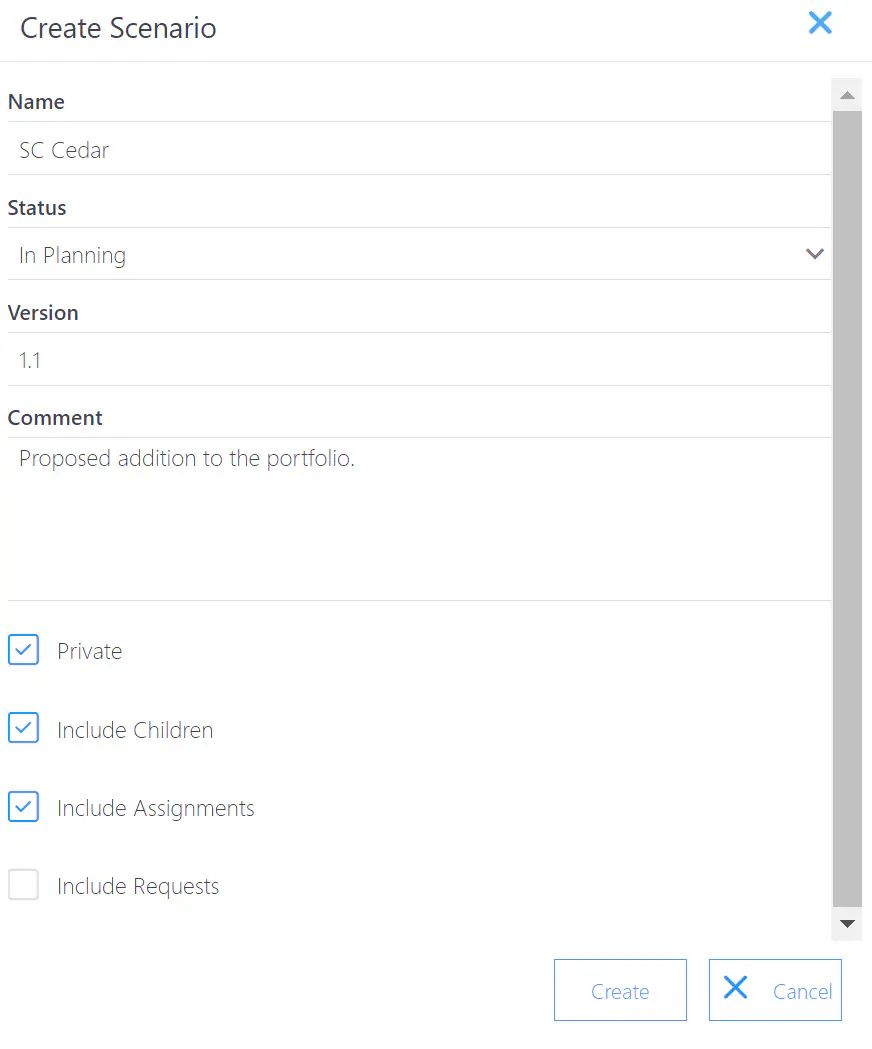
Name – A brief, meaningful name
Status – Optional – See Scenario States and Workflow for uses of the Status field
Version – Optional version number
Comment – Optional description
Private –
If checked (Default), the scenario is a private scenario; no one can see the scenario but the originator. The Owner can grant read or write access to other users.
If Private is not checked, the scenario is a public scenario. Other users can see all elements of the scenario for which they have access rights.
Include Children –
If checked (Default), all child projects (sub-projects) of selected projects are included in the scenario copy.
If not checked, only the selected projects are included.
Include Assignments –
If checked (Default), all labor, financial, and asset assignments for the project are included with the selected projects.
Include Requests –
If Unchecked (Default), Request assignments for the selected projects are NOT included.
Step 5: Click the Create button.
Add a Project to a Scenario
When a project is included in a scenario,
A new (scenario) project is created with its own database project ID (PID).
All source project field values are copied into the scenario including project start, end, and phase and milestone dates.
The source project PID is copied into the scenario project Original PID field to create a link to the source project.
All asset, labor (resource, skill, and team), and financial assignments are copied to the scenario project(s).
The source project task plan (GANTT page) is copied into the scenario.
Step1: Go to the Project Data page in Grid mode.
Step 2: Select one or more projects using the checkboxes on the left.
Step 3: Click the Baseline, Status, Scenario & Templates icon in the upper left page toolbar icon group.
Step 4: Click Create Scenario to launch the Create Scenario dialog and enter scenario attribute values.
Add an Assignment to a Scenario
When an existing assignment is included in a scenario by the “Add to to Scenario” button on Assignment pages,
A new (scenario) assignment is created with its own database assignment ID (AID).
All source assignment field values are copied into the scenario assignment
The source assignment AID is copied into the scenario assignment Original AID field to create a link.
Note: If the project referenced in the assignment is not in the scenario, the project is added to the scenario without other assignments if any. The only assignments added for the new project are those selected on the assignment page.
New Assignments CAN be created directly in scenario projects with the Add Assignment dialogs on the Assignment pages (simply choose the scenario project in the add assignment dialog).
New assignments created in a scenario project DO NOT have a value in the Original AID field, since there is no source assignment to link to.
Simple Scenario Result
With the selection checkbox checked on the row for project Cedar and the specification in the screen shot below, you will create a private scenario named SC Cedar containing a copy of the Cedar project with all its sub-projects and assignments, but not including any currently Open requests.
Distinguishing Scenario Records from Source Records
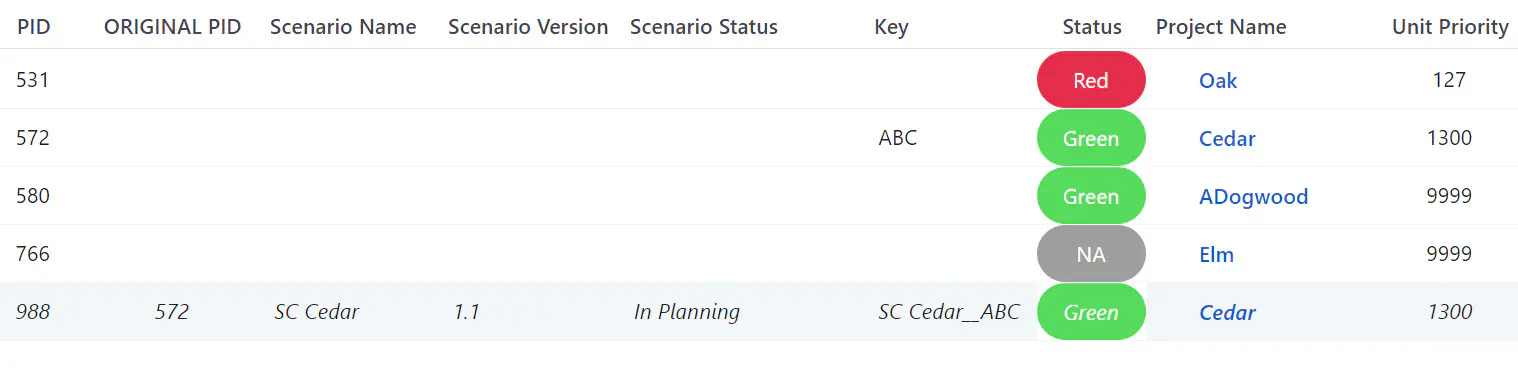
Since projects and assignments added to a scenario have the same name values in the scenario as the source values, scenario records are highlighted with italic font and with a gray background color.
The Project Key field value in scenario projects is created automatically when the scenario is created.
Notice the Cedar scenario Key field in the Project Data Page screenshot below. The source project Cedar has a Key value “ABC”. The scenario “SC Cedar” contains a project named “Cedar” with a Key value “SC Cedar_ABC“.
In addition, all scenario records created from existing source records include the source record ID in a scenario field ORIGINAL PID for project records and ORIGINAL AID for assignment records. These fields link the scenario record to the source record for use when the scenario is posted to the current plan.
Finally, the Scenario Name, Status, and Version fields can be displayed on the Project Data page grid and on all assignment pages. These three fields are available for selection in the Edit View dialog.
Project Data Page
Labor Assignment Page
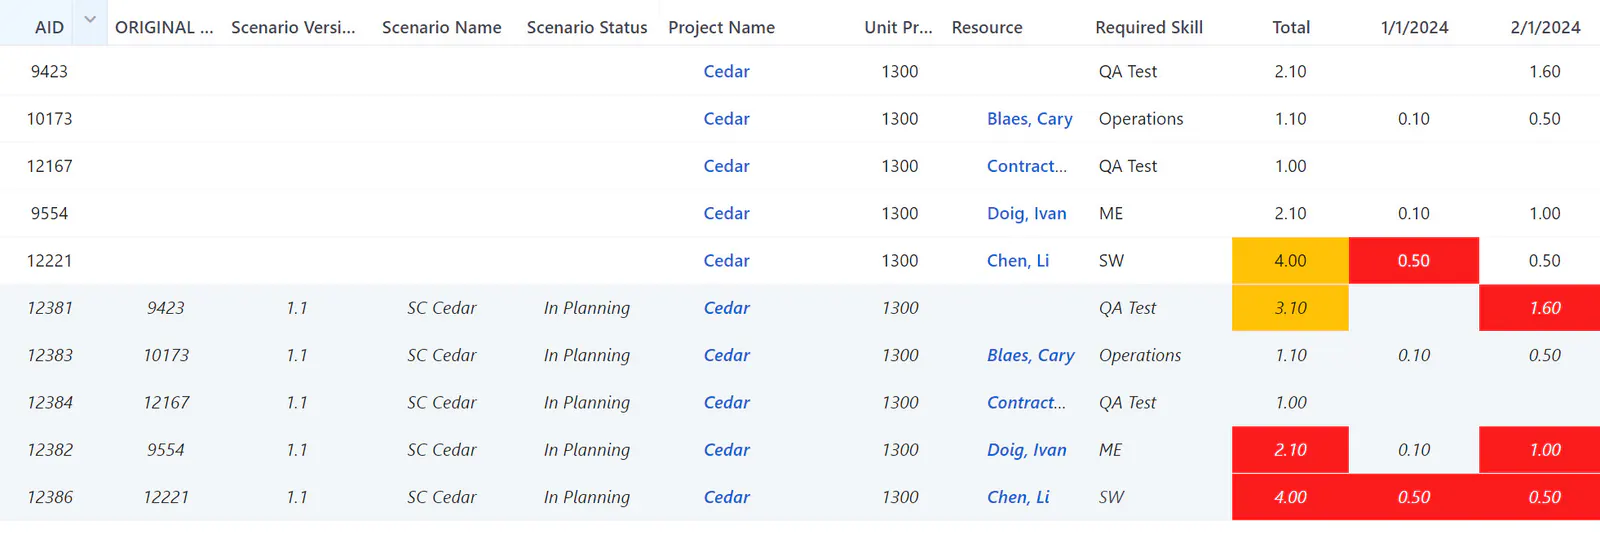
Note: If you drill down to project detail pages from a global assignment page, ALL the assignments will be of one format or the other.
This is because the project you drill down from is either a source project or a scenario project.
Note: If include assignments or include children are selected when a scenario is created, ALL included records in the database are part of the scenario regardless of the current data load project and resource OBS selections.
During the current login session you will see only the data load records. In a subsequent session with broader data load OBS selections you may see more, or all, scenario projects and assignments.