Server Settings and General Defaults
This article explores the Server Settings menu, which includes general system defaults, timesheet settings, color thresholds, report settings, and more.
Overview
Many default functions are controlled via the Server Settings menu, including standard ResourceFirst system defaults (such as session timeout and page row count), Time tracking settings, thresholds for demand and forecast color coding, the Allocation Algorithm, and report server settings.
How To
Step 1: To access the Server Settings menu, go to Administration > Server Settings.

Step 2: You will be presented with the Server Settings page (pictured below). Use the +/- controls to expand/collapse each section and scroll bar to navigate if needed within a section.
There are eight main sections on the Server Settings page.
-
- General
- Policies
- Time Tracking
- Allocation Algorithm
- Financial Labor Settings
- Color Options
- Project KPIs
- Reporting Server
Step 3: When completed, click the Save Settings button on the bottom right of the page.
Below is a description of each setting by section.
General Settings
The General Settings area includes a variety of controls related to the appearance and general functioning of ResourceFirst. An explanation of each setting is below the image.


Topbar Color – Allows you to change the color of the top bar in ResourceFirst
Session Timeout – In minutes, how long the system should wait before timing out a user’s session
Page Row Count – How many rows to show on each page
Maximum Comment Length – For comment fields, the maximum number of characters the user can type
Maximum Days Allowed for Delegate Rights – Users can delegate their rights to others for a period of time (for instance if they are on leave). Here you can set the maximum time window (number of days in a row) a user can delegate their rights to someone else for.
Special authorizations: For the items bulleted below, the level of authority required to perform those functions (e.g., P2 or R2 Edit Rights to the target project or resource (respectively), P3 or R3 Node Admin rights to the OBS node that the target project or resource is associated with, or overall Administrator Rights). For more on rights, see Administering Rights and Privileges.
-
- PMO Access Level (i.e., who is able to see the PMO icon and its menus?)
- Project Initiation Approval
- Project Add
- Project Delete
- Project Status
- Resource Delete
- Assignment Delete
Enable Actual Edit on Assignment Views – allows editing of actuals when toggled to Actuals on Assignment Views. If not checked, the actuals shown are read only.
Split Assignments on Changes – If checked, then if core attributes (such as Effort State, Cost Category, Location, Country, or Required Skill) on an assignment row are changed, the system will create a new assignment row with the changes, leaving the old assignment intact. All existing future forecasts for the assignment are moved to the new row.
What to Show in Path Columns – Specifies for all columns that show the node path (such as Resource Org), what will appear in that field. The choices are the full node path, only the leaf node, or the Node Key data. For a full explanation of how the node path and node key are used, see Export and Import Data.
Assign to Leaf Projects Only – If checked, then assignments will only be allowed at the lowest leaf project OBS level.
Drill Down to Project After Create – If checked, when a user creates a new project, he or she will immediately be taken to the project’s info form to complete additional data, rather than go to the Project Data page.
Minimum Org Level for Assignments – Here you can specify the minimum level in the Resource OBS hierarchy where labor assignments will be allowed to be entered.
Lock Financial Labor Assignment Manual Entry – If checked, this will prevent manual entry of labor dollars on the Financial Assignments page, for instance if only labor cost that’s posted via the Post Labor function is allowed.
Force Project Picklist Filter on Assignments – If checked, only project picklists will be allowed for project selection when adding new labor assignments. The user will not be able to navigate through the Project OBS to find projects. For more on this, see Using Picklists.
Allow Managers to Assign Rights to Their Users – If checked, then any manager with R3 rights will see the Assign Rights option under their user profile. This will enable them to assign rights to any users in nodes the manager has R3 rights to. Managers can only assign rights to the level they themselves have.
Enable Request – allows for requesting resources via the Requests button on the Assignments page.
Auto-Approve Requests – turns on automatic approvals for resource or skill requests, so the Resource Manager doesn’t have to approve each request. The Request then becomes a Resource or Skill Assignment.
Enable Teams – Allows Teams functionality to be used.
Enable Agile – Allows Agile functionality to be used.
Auto-Approve Request From – Specifies which resource or skill requests should be auto-approved (requests from Project Managers, or only from those with Project Edit rights).
Comment on Project Saves – Allows the user to enter comments whenever a change to a project is saved.
Show Level on Project Add Dialog – If checked, will allow the user to select a parent level while adding new projects. This will filter the OBS selection to only show OBS levels below the parent, making OBS selection easier in organizations with a deep OBS hierarchy.
Policies
Here you can specify links for your organizations privacy and/or cookie policies. If specified, they will appear under the main Information section (the  icon), where the Help function is, in the upper right of your ResourceFirst screen.

Time Tracking Settings
The Time-Tracking section in Server Settings is as follows:

Time Tracking In – Enables time tracking to be done in hours, FTEs, or both.
Max Allowed Hours – Sets the maximum allowable hours in a day someone can work.
Min Allowed Hours – Sets the minimum allowable hours in a day someone can work.
Hours per 1 Day FTE – For FTE calculations, determines the hours to assume per FTE.
Exclude Inactive Resources from Compliance – Suppresses compliance alerts for inactive resources. This is useful if someone is away for an extended period, or for resources who have left the organization but are still in the system as inactive.
Exclude Weekends – Does not show weekends in timesheets.
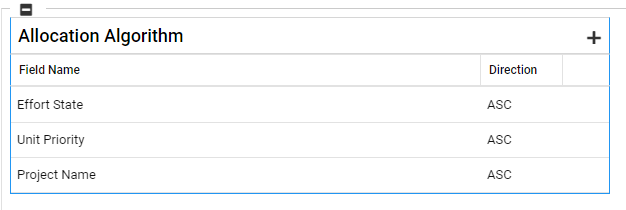
Allocation Algorithm
ResourceFirst has a powerful and flexible Allocation Algorithm engine to determine the sequence in which resources are allocated to projects. By default, the sequence of allocation ls:
-
- Effort State (this is only used if “Allocate Committed First” is checked on the Assignments page under Optimization). The Effort States and which states are committed first is defined in Administration > Lists > Effort State. For example, an effort state of Committed (or Hard Booked) can be specified to be allocated before “Proposed” (or Soft Booked) state assignments. These rules are defined in the Effort State List.
- Unit Priority – If Allocate Committed First is unchecked in Optimization on the Assignments page, then allocation happens primarily in unit priority order. The highest priority projects get dibs on the resources, and whatever availability is left can be used for lower priority projects. If Allocate Committed First is checked, then Unit Priority is used secondary to Effort State. For instance, Committed (or Hard Booked) assignments will be allocated first, in Unit Priority sequence.
- Project Name – All else being equal, Project Name is the third default allocation sequence.
Additional fields can be used in the Allocation Algorithm as desired. It is best to review this with your PDWare representative to discuss the implications of any changes.
Financial Labor Settings
The Financial Labor settings in ResourceFirst determine how labor costs for projects are to be posted to Financial Assignments.

If “Use Client Labor Cost Calculation” is checked, labor costs will be automatically posted to the Financial Assignments page for each project. Otherwise, the user would have to go to the Project Workspace Financials tab for any project and click the Post Labor Costs button.
For automatic labor cost posting, the Financial Labor algorithm determines how the labor costs will be summarized on the Financial Assignments page. The Cost Rate divider determines how the costs will be calculated vs. the rate. The default is 1.
Click the Add (+) button to add new fields to the summary calculation, or to delete a field, click on the field and click the trash can icon to the right.
Color Option Settings
In ResourceFirst, it’s easy to set color thresholds for key dashboards and views.

Project Demand (i.e., Percent Filled)- On Project Demand Views, specifies the percentage of the demand that’s been filled by resource assignments. In the example, if a resource demand is only 95% satisfied, the demand will show as yellow. If it’s only 90% satisfied, it appears as orange. And if it’s only 70% satisfied or less, it appears as Red.
NOTE: Skill Assignments (as opposed to Resource Assignments) are by default Red until they are filled with named resources. So, a Project Demand row that’s showing red could mean that it has resource shortfall or simply that it has skill assignments that haven’t been filled yet.
Effort Forecast (Assignment) (i.e., Percent Filled) – On Assignment Views, specifies the percentage of the effort forecast that’s able to be filled, given the overall capacity of the resource and the priority of this assignment relative to others for the resource. In the example, if a resource assignment is able to only be 99% filled by the resource, the assignment will show as yellow. If it can only be 75% filled, it appears as orange. And if it can be 50% filled or less, it appears as Red, depicting a significant shortfall.
Resource Utilization (i.e., Percent Utilized) – On Resource Utilization Views, specifies the utilization percent of the resource. In the example, if a resource is 70% utilized or less, their utilization will be blue (under-utilized). If they’re utilized 101% or more, their utilization will be red (overload situation). Normal utilization is always shown in white.
IMPORTANT NOTE: If you have Optimization turned on (Use Availability for Skill Assignments), the coloring thresholds in each area relate to the “State of Feasibility” as opposed to the “State of Allocation” in each case.
Project KPIs
In this section, you can specify which project KPIs you would like to appear on the Project Workspace and in KPI summary dashboards. How these KPIs are calculated are defined in Administration > Ranking. See Setting Up Scoring and Ranking Criteria for more details. Rather than calculated KPIs, some organizations prefer to create their own User Defined Fields for Green/Yellow/Red indicators for various elements, such as Scope, Risk, Schedule, Cost, Quality, etc., which can be manually updated by project managers.

Reporting Server Settings
Reporting Server settings are part of the technical installation of the application, which PDWare will guide you through.

Saving Your Changes
Once your settings have been updated, remember to click Save Settings at the bottom right of the page. Note that you can also Export the settings to a CSV file via the Export button the in bottom right, and you can reset your settings to the factory settings via the Reset button. Use extreme caution in doing this.
