Administering Rights and Privileges
This article shows how to define, edit, and duplicate user rights in ResourceFirst.
Description
Rights and Privileges Overview
ResourceFirst allows the granting of various access level rights to users, either to individual projects or resources, or to entire project or resource node structures. This article outlines how to administer those rights.
Users vs. Resources
It is worth noting that there are two separate elements in resource first regarding people: Users and Resources.
- Rights are granted to Users.
- Users log into the system and can see or execute whatever functions they have rights to.
- Resources are assigned to projects and can enter actuals via timesheets.
- A Resource is associated with a User by specifying the user login ID in the Resource Key column on the Resource Data page.
- If a User does not have an associated Resource, then the user can sign in and do most functions, but won’t see a Home page and won’t be able to enter time.
- If a Resource does not have an associated user, then that person cannot sign in, though the resource can be assigned to projects and someone can enter forecasts for them as a resource.
Rights and their Privileges (Table)
The following table lists the available rights and the respective privileges. For more detailed descriptions of each right, see the section, Rights Defined, in this article.
Note that when referred to in project, resource, or timesheet type rights, these general guidelines apply:
- Read only rights = Enables view only capability.
- Data rights = Enables the editing of the numbers on the object, such as forecasts and assignments.
- Edit rights = Enables editing the various attributes of the object in addition to the numbers.
- Administrator rights = Enables full access to the object’s numbers and attributes plus additional functions.
Rights can apply to a specific instance, such a Project ABC, or across all projects in an OBS node. It is the same with other objects, such as Resources. The “Applies To” column in the chart below designates which each right is applicable to.
Note: Newly granted and/or updated Rights take effect the next time the User logs-in. If the User is in the system at the time of the update, ask them to log out/log in.
| PDWare User Right | Right Abbreviation | Applies To | Privileges |
| Administrator | No abbreviation | Application | All system functions. |
| Resource Read Only | R0 | Resource Node | View resources in authorized OBS node(s). |
| Resource Data | R1 | Resource Node | Modify Resource Capacity and Effort Forecasts. |
| Resource Edit | R2 | Resource Node |
|
| Resource Administrator | R3 | Resource Node |
|
| Project Read Only | P0 | Project Node | View projects in authorized OBS node(s). |
| Project Manager | P1 | Individual Projects |
|
| Project Edit | P2 | Project Node |
|
| Project Administrator | P3 | Project Node |
|
| Project Picklist | PL1 | Individual Projects | Reveals the selected projects to appear in the project drop down in the Assignment page>Add Resource Assignment >Project drop down list. Note: This permission ignores the Global Filter settings. |
| Project Node Picklist | PL2 | Project Node | Reveals the projects associated in the selected OBS nodes to appear in the project drop down in the Assignment page>Add Resource Assignment >Project drop down list. Note: This permission ignores the Global Filter settings. |
| Baseline | No abbreviation | Not applicable | Enables User to submit a baseline of the resource and financial forecasts for projects they have rights to. |
| Official Baseline | No abbreviation | Not applicable |
|
| Partition Admin | No abbreviation | Not applicable | Enables the user to share specific content with all users designated with the same partition. |
| Financial Read-Only | F0 | Resource or Project Node | View Financial Assignments in authorized OBS node(s). |
| Financial Project Manager | F1 | Individual Projects | Edit project financials and delete financial assignments on specifically granted projects |
| Financial Edit | F2 | Resource or Project Node | Modify Financial Assignments Run Post Labor Costs |
| Financial Administrator | F3 | Resource or Project Node |
|
| Rates Read-Only | FR0 | Resource Node | View Rates in authorized OBS node(s). |
| Rate Edit | FR2 | Resource Node | Modify User Rates (in conjunction with R3) |
| Timesheet Approval | T0 | Individual Resource | Approve Timesheets for an individual. |
| Timesheet Approval | T1 | Resource Node | Approve Timesheets for a node. |
| Timesheet Auto | T2 | Individual Resource | Enable automatic approval for timesheets submitted by specific resources. Grant this to either the Approver or to a generic User, such as an Admin User. |
| Timesheet Auto | T3 | Resource Node | Enable automatic approval for timesheets for all resources within a node. Grant this to either the Approver or to a generic User, such as an Admin User. |
For a full definition of each of these rights, see the section: Rights Defined.
Other types of system rights include:
Special Rights – Some system elements are configurable based on rights. In this case, rights act as a flag, and you can choose which rights allow those configurable functions. For example, to delete a project, you can decide if this requires P2, P3, or Admin rights. This is set in Admin>Server Settings. For more details, see the section: Admin>Server Settings that Reference Rights.
Rights to See or Edit Specific Fields – Hide and Edit – are available to determine which rights can see or edit those fields. Read the section: Field specific Rights – Hide and Edit
Authorized managers can grant rights to others. Read the section: Allow Resource Managers to Assign Rights to their Users
Setting up Your ResourceFirst Admin
ResourceFirst is delivered with a generic user called Admin, which has super user permissions. The PDWare representative will provide you with that Admin’s initial password. PDWare will work with you to get your ResourceFirst Admin’s name logged as a Super User.
To configure a super user requires additional rights beyond just Administrator. Here is the comprehensive list:
- Administrator
- Official Baseline
- Financial Administrator (F3); associate with the highest OBS node
- Timesheet Approval (T1); associate with the highest OBS node
- Partition Administrator
Strategies for Setting Up Basic Rights by Role
There are many options and variations for setting up rights. A simple, basic setup might include setting up the following:
- Read-Only Users – These are non-resource users for those who simply need to sign into the system but not enter time and or get assigned to projects. This is sometimes used for executives who simply need to log into view reports. These users can have R0 (resource read-only) and P0 (project read-only) rights to “All” nodes, and F0 (Financial read-only) to all nodes if they need to view financial assignments.
- Project Managers – Project Managers should be set up with P0 (Project Read) rights to All nodes, plus P1 rights to any projects they’re managing.
- If they will also need to create or delete projects, then they can be granted P2 or P3 rights to the nodes in which they’re authorized to create and delete projects (depending on the access level for add and/or delete defined in Admin–>Server Settings).
- Note: When a resource is selected as a project manager via the “Manager” dropdown on a project’s attributes, the P1 right is assumed and not explicitly granted.
- They should also be granted at least R0 (Resource Read) rights to all nodes from which they will be using resources on their projects. If project managers will be entering skill or resource assignments directly, they will need R1 (Resource Data) rights to said nodes (See “Considerations for the Labor Assignment Creation Process” below).
- If they will be saving baselines, they will also need Baseline rights.
- Users Authorized to Create and Delete Projects – Those who can create and/or delete projects must be granted P2 or P3 rights to the nodes in which they’re authorized to create or delete projects (depending on the access level for add and/or delete defined in Admin–>Server Settings). Many organizations have a select group of superusers or functional managers who can create and delete projects and assign project managers.
- Resource Managers – Resource/functional managers should be set up with at least R1 (Resource Edit) rights to the nodes they will be managing.
- If they will be adding and/or deleting resources, they should instead be set up with R2 or R3 rights to the nodes they are managing (whether it is R2 or R3 depends on the Admin–>Server Settings options for which level is required for resource creation and/or deletion).
- If they will be deleting assignments, they should be set up with R2 or R3 rights to the nodes they are entering assignments for (whether it is R2 or R3 depends on the Admin–>Server Settings options for which level is required for assignment deletion). (See “Considerations for the Labor Assignment Creation Process” below)
- They should be set up with P0 (Project Read) rights to all nodes. This is necessary for entering assignments for any project.
- If they are expected to be able to see all resources, including those outside their department, they should be granted R0 (Resource Read) to all nodes. This is a best practice.
- R3 rights are needed if the resource managers are expected to be able to assign rights for their staff.
- If the resource manager will be approving timesheets, they should be granted one of the timesheet approval rights (T0 through T4 — see above table for details).
- If the resource managers should only see projects from a defined picklist of projects (rather than navigating to find them in the node structure), they can be assigned PL1 (Individual Project Picklist) or PL2 (Project Node Picklist) to the project(s) or node(s) desired. To force the use of project picklists for all, check the “Force Project Picklist Filter on Assignments” checkbox in Admin–>Server Settings.
- Core Team Superusers – Core Team Superusers should be granted P3 (Project Administrator), R3 (Resource Administrator), F3 (Financial Administrator), FR2 Rate Edit, Baseline and Official Baseline rights. Additional rights, including Administrator rights, can be granted as needed.
Considerations for the Labor Assignment Creation Process
A best practice for the request and creation of labor assignments (aka effort forecast) is as follows:
- The project manager and resource/functional managers collaboratively determine the skills, potential candidates, and timing as needed for the project, based on the scheduled phases and milestones. Dates may need to adjust depending on resource availability.
- The resource/functional manager, in cooperation with the project manager, creates skill assignments and/or resource assignments as a result of the collaborative assessment. Optionally, a project template can be created in advance with the typical skills for that project type. Then the appropriate resource manager(s) can use and/or alter as needed.
- For skill assignments, when appropriate, the resource manager replaces each skill assignment with a named resource. The named resource replacement will often be done later as it gets closer to the timing of the activity. This is called horizon-based resource planning.
- If the project forecast changes throughout the project (which is likely), repeat steps 1-3.
Notes:
- In some organizations, other methods are used, including a request/approval process whereby the project manager requests resources from the resource managers who must then approve, or a project manager-driven approach whereby the project manager enters resource assignments and the resource managers review after the fact. These other methods have their drawbacks. See Recommended Demand and Capacity Workflow for details.
How To
Accessing and Navigation of the Rights Page
Accessing the Rights Page
To access the Rights page, click the Admin icon ![]() in the blue application toolbar, then select Rights.
in the blue application toolbar, then select Rights.

Note: A user with R3 Resource Administrator rights will also see an Admin icon, but they will only see the Admin submenu option to Lock OBS nodes.
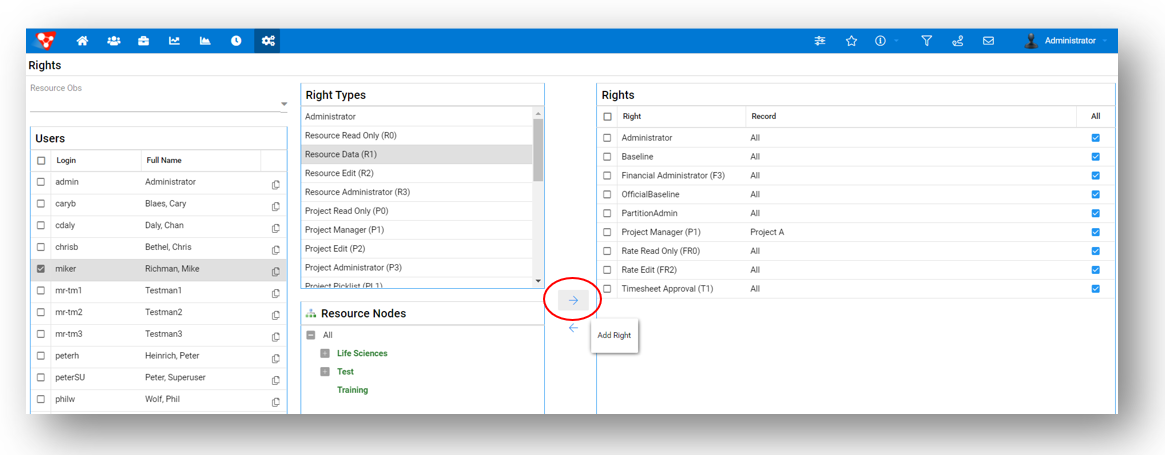
Navigating the Rights Page
Sections on this page include:
- Resource OBS section (upper left): If you would like to apply and/or remove rights quickly to groupings of Users, select the OBS node(s) from within this area.
- Users section: Users are listed here for which you will assign rights.
- Icon for the Copy User’s Rights: To the right of the user’s name you will find an icon that appears as a double page. This allows you to copy a user’s rights to one or more users.
- Rights Types: Lists the available rights to assign.
- Resource Nodes (Appears below the Right Types): Lists the available OBS nodes against which you will apply the rights. Alternatively, for some rights, individual projects or resources will appear here instead of nodes.
- Note: some rights do not include OBS nodes, resources or projects; rather they are applied at the system level.
- Rights section: Lists the rights applied to the resource(s). If this section is blank, this means that the resource(s) have yet to receive assigned rights. You use the right or left arrows on the left of this box to add or remove rights for a user.

Steps to Grant and Rescind Rights
Rights can be granted to an individual User, or to a group of users (either via multi-select or by node).
Granting rights to an individual
Follow these steps:
- Step 1: In the Users section, place a check next to the name of the user for whom you will apply the right(s).
- Step 2: In the Rights Type section, highlight the right to be applied.
- Note: Only one right can be selected at a time.
- Step 3: If the Right selected is meant to be applied to a Resource or Project OBS Node, or to individual projects or resources, those items will appear below the Rights Type section. Select the appropriate item(s) to which to apply the rights.
- Note: Multiple OBS Nodes, projects, or resources can be selected at the same time.
- Step 4: Press the right arrow to move the Right/Target Item association into the Rights section.
- To rescind a Right, highlight the Right located in the Rights section on the right of the page and then press the left arrow to rescind.
Granting and Rescinding Rights to More than One User
Two approaches can be used:
- Approach 1 (Pick the users): Place check marks next to the multiple Users. Scroll down to find all of your selection.
- Approach 2 (Filter by OBS): In the Resource OBS dropdown found in the upper left corner of the Rights page, navigate to the OBS node that holds the group of Users to receive the Right.
Approach 1 (Pick the Users): Place check marks next to the multiple Users. Scroll down to find all of your selection. Follow these steps:
- Step 1: In the Users section, place a check next to the names of users for whom you will apply the right(s). You may need to scroll down the list to find all names.
- Step 2: In the Rights Type section, highlight the right to be applied.
- Note: Only one right can be selected at a time.
- Step 3: If the Right selected is meant to be applied to a Resource or Project OBS Node, or to individual projects or resources, those items will appear below the Rights Type section. Select the appropriate item(s) to which to apply the rights.
- Note: Multiple OBS Nodes, projects, or resources can be selected at the same time.
- Step 4: Press the right arrow to move the Right/OBS Node association into the Rights section.
- To rescind a Right, highlight the Right located in the Rights section on the right of the page and then press the left arrow to rescind.
Approach 2 (Filter by OBS): In the Resource OBS dropdown found in the upper left corner of the Rights page, navigate to the OBS node that holds the group of Users to receive the Right. Follow these steps:
- Step 1: In the Resource OBS section found in the upper left corner of the rights page, navigate to the OBS node that holds the group of users to receive the Right.
- Step 2: To the list of Users associated with the selected OBS node, either:
- Place check marks next to the subset of names, or
- Place a check mark in the top box to automatically select all names in that list.
- Step 3: In the Rights Type section, highlight the right to be applied.
- Note: Only one right can be selected at a time.
- Step 4: If the Right selected is meant to be applied to a Resource or Project OBS Node, or to individual projects or resources, those items will appear below the Rights Type section. Select the appropriate item(s) to which to apply the rights.
- Note: Multiple OBS Nodes can be selected at the same time.
- Step 5: Press the right arrow to move the Right/OBS Node association into the Rights section.
- To rescind a Right, highlight the Right located in the Rights section on the right of the page and then press the left arrow to rescind.
Copying Rights from One User to Another
Icon for the Copy User’s rights: To the right of the User’s name you will find an icon that appears as a double page. If you click on the icon to the right of the user (within that left pane), you’ll be presented with a dialog allowing you to duplicate that user’s rights to one or more users.
Rights Defined
Before you begin working within ResourceFirst, you must have the necessary rights and privileges. If you require additional rights, contact your ResourceFirst administrator. The following access rights are available to view, edit, or administer ResourceFirst features and capabilities.
RESOURCE READ ONLY (R0)
- Enables viewing of all records related to the resources in the OBS Node to which the user has R0 rights. Includes skill assignments and resource assignments in that OBS Node.
- Right is applied to a Resource Node
RESOURCE DATA (R1)
- Enables editing of capacity and/or forecast data (not the resource or assignment attributes).
- Enables the creation and update of skill assignments and resource assignments to projects.
- Right is applied to a Resource Node
RESOURCE EDIT (R2)
Enables:
- Includes all Resource Data (R1) rights
- Editing of resource-specific attributes
- Adding skills to resources
- Adding Resources
- Deleting Resources (as defined in the Server Settings rights levels for Resource Delete)
- Right is applied to a Resource Node
RESOURCE ADMINISTRATOR (R3)
Various system level configurations refer to this right and will grant access to the feature/functionality accordingly. These configurations include:
- System Settings configurations
- Column Headings settings that grant Hide and/or Edit rights to a particular field
Said differently, this right provides a way to configure the system to behave differently for users who have various Right levels. For instance, a User with R2 may not be able to see something, but with R3 they could see and possibly edit a field or execute a certain function (such as deleting resources). Certain functions can be restricted to either R3 users, Admins, or other levels.
Inherently, the Resource Administrator (R3) right has:
- A higher hierarchical position over the R0, R1, and R2 rights. In other words, if a capability is restricted for R0 or R1 or R2, the R3 right is un-restricted.
- Can create a new Resource on the Resource>Data page. Note: To create a new User on the Admin>Lists>User page requires the Administrator right.
System level configurations that allow setting special privileges for the Resource Administrator (R3) right include:
- Found on the Admin>Server Settings page (see the article Server Settings and General Defaults for more details):
- Viewing the PMO Access pages
- Granting the Project Initiation Approval right
- Granting the Project Add right
- Granting the Project Delete right
- Granting the Resource Delete right
- Granting the Assignment Delete right
- Found on the Admin>Column Headings page on each of the View types (Resource/Project/Assignment) for field level security:
- Hide Rights
- Edit Rights
- Right is applied to a Resource Node
PROJECT READ ONLY (P0)
- Enables view-only of projects.
- Enables creating assignments if also granted Resource Data (R1) or higher resource rights level.
- Right is applied to a Project Node
PROJECT MANAGER (P1)
- Note: Project Read Only (P0) is required as an additional right for this right to properly operate. P1 does not automatically inherit P0 rights.
- Enables editing of project information.
- Enables creation of project events (e.g., risks, issues, etc.). Most companies configure Risks and Issues and Change Requests and possibly other project related events in this area.
- Enable contributions in the project’s Discussion threads.
- Enables submission of project status information. Note: Project status submissions are done by pressing the Submit Status icon on the upper right of the Project Status form (see diagram below).

- Right is applied to individual projects.
Note: Assigning Project Managers: If a user’s name is placed directly into the Project Manager field when in a project view page or a project form, this user will inherit Project Manager P1 rights, even if they have not been specifically granted P1 rights.
Navigation when granting Project Manager (P1) rights:
- In the Users section, select the User(s) to receive the specific Project Manager rights you are granting.
- Select the Project Manager (P1) right
- Next:
- Option 1: In the Project OBS section, navigate to and select the appropriate OBS Node. The resulting projects displayed in the Projects section will reflect those projects in the selected OBS Node. Only one OBS Node can be selected at a time, so repeat this step for additional OBS Nodes. This approach enables the User to grant Project Manager (P1) permissions to all existing projects plus future projects added to the OBS Node(s) selected.

- Option 2: The check box Filter based on Project Data is used when you need to grant this right based on a specific subset of projects that you have already selected on the Project Data page. In other words, you will have used either the master funnel filter located in the blue ribbon at the top of the screen and/or applied column filters on the Project Data page. The resulting projects displayed in the Projects section on the Rights screen will reflect those projects that appear on the filtered Project Data page. Select the project(s) for which the right needs to be granted.

- Option 3: If selecting only one or a few projects is desired from the filter result set created by Options 1 and/or 2, go directly to the Projects section on the Rights page and select the project(s) for which the right needs to be granted.

- Once the projects are identified, press the right arrow to move the Rights over to the Rights section.
PROJECT EDIT (P2)
- Can enables creation of a project, deletion of a project, or to begin a project initiation instance (depending on the access settings in Admin–>Server Settings, which determines whether P2, P3, or Admin rights are needed for these functions).
- Enables editing of project attributes.
- Right is applied to a Project OBS Node
Note: To assign resources to a project, the User also needs either the Resource Data (R1) or the Resource Edit (R2) rights.
PROJECT ADMINISTRATOR (P3)
Various system level configurations refer to this right and will grant access to the feature/functionality. These configurations include:
- System Settings configurations
- Column Headings settings that grant Hide and/or Edit rights to a particular field
Said differently, this right provides a way to configure the system to behave differently for users who have various Right levels. For instance, a User with P1 may not be able to see something, but with P3 they could see and possibly edit a field or perform other functions, such as delete a project. Via the Admin–>Server Settings page, certain functions can be restricted to either P2 users, P3 users, or Admins.
Inherently, the Project Administrator (P3) right has a higher hierarchical position over the P0, P1, P2 rights. In other words, if a capability is restricted for P0 or P1 or P2, the P3 right is un-restricted.
System level configurations that reference the Project Administrator (P3) right include:
- Found on the Admin>Server Settings page:
- Viewing the PMO Access pages
- Granting the Project Initiation Approval right
- Granting the Project Add right
- Granting the Project Delete right
- Granting the Resource Delete right
- Granting the Assignment Delete right
- Found on the Admin>Column Headings page on each of the View types, Resource/Project/Assignment for field level security:
- Hide Rights
- Edit Rights
- Right is applied to a Project OBS Node
Project Picklist (PL1)
Reveals the selected projects to appear in the project drop down in the Assignment page>Add Resource Assignment or Add Skill Assignment functions. Note: Use of a project picklist is independent of the Global Filter settings. In other words, in the picklist dropdown, projects in the picklist will appear regardless of what nodes are set in the Global Filter. However, you wouldn’t see the resulting assignment unless the appropriate nodes are selected in your Global Filter.
- Right is applied to individual projects.
Navigation when granting Project Manager rights:
- In the Users section, select the User(s) to receive the specific Project Picklist rights you are granting.
- Select the Project Picklist (PL1) right
- Next:
- Option 1: In the Project OBS section, navigate to and select the appropriate OBS Node. The resulting projects displayed in the Projects section will reflect those projects in the selected OBS Node. Only one OBS Node can be selected at a time, so repeat this step for additional OBS Nodes. This approach enables the User to grant Project Picklist (PL1) permissions to all existing projects plus future projects added to the OBS Node(s) selected.
- Option 2: The check box Filter based on Project Data is used when you need to grant this right based on a specific subset of projects that you have already selected on the Project Data page. In other words, you will have used either the master funnel filter located in the blue ribbon at the top of the screen and/or applied column filters on the Project Data page. The resulting projects displayed in the Projects section on the Rights screen will reflect those projects that appear on the filtered Project Data page. Select the project(s) for which the right needs to be granted.
- Option 3: If selecting only one or a few projects is desired from the filter result set created by Options 1 and/or 2, go directly to the Projects section and select the project(s) for which the right needs to be granted.
- Once the projects are identified, press the right arrow to move the Rights over to the Rights section.
For more on ProjectPicklists, see Using Picklists.
PROJECT NODE PICKLIST (PL2)
Causes the projects within the selected OBS nodes to appear in the project drop down in the Assignment page>Add Resource Assignment or Add Skill Assignment functions. Note: Use of a project picklist is independent of the Global Filter settings. In other words, in the picklist dropdown, projects in the picklist will appear regardless of what nodes are set in the Global Filter. However, you wouldn’t see the resulting assignment unless the appropriate nodes are selected in your Global Filter.
- Right is applied to a Project OBS Node
For more on ProjectPicklists, see Using Picklists.
BASELINE
Enables User to submit a baseline of the resource and financial forecasts for projects they have rights to.
Note: At a minimum, To save a baseline, the user needs P1 rights to the project, or P2 or above on the project node, and R1 or higher on the resource node.
OFFICIAL BASELINE
- Includes the Baseline rights.
- Enables the User to approve and commit a baseline as official. A checkmark on the page indicates the baseline is marked as official.
- An “Official” baseline adds a snapshot of the assignments’ attributes in addition to capturing the forecasts. These “snapshots” can be used in Qlik reports. In other words, a baseline is saved, which only captures the forecast data and points to current attributes) plus a full snapshot, which includes the forecast data AND the attributes.
PARTITION ADMIN
- A Partition Administrator of a partition is enabled with the rights to share various settings, views, filters, and other attributes with members of their partition.
- A partition member will find the shared items as options to select for their use.
- A User can only be a member in one partition.
- To create a Partition Administrator: The ResourceFirst Admin creates the partition names on the Admin–>Lists–>Partitions page. 2) Next, the ResourceFirst Admin goes to Admin>Lists>Users>Partition column and selects the newly created partition value for the User(s) who will be that partition’s administrator(s).
- To create a partition member: The ResourceFirst Admin goes to Admin>Lists>Users>Partition column and selects the newly created partition value for the User(s) who will be members of that partition.
For more on partitions, see Using Partitions.
FINANCIAL READ ONLY (F0)
- Enables viewing of all financial records in the OBS Node to which you have F0 rights.
- Right is applied to a Resource OBS Node or Project OBS Node depending upon your business practice. (Note: A setting in your License Key determines which OBS appears below the Rights pane, and therefore which OBS is used for granting Financial Rights). See License Keys and Codes – Appended Letters for more.
FINANCIAL PROJECT MANAGER (F1)
- Enables edit of financial data and deletion of financial assignments on the specific projects identified when granting this right.
- Right applies to individual projects.
Navigation when granting Financial Project Manager rights:
- In the Users section, select the User(s) to receive the specific Financial Project Manager rights you are granting.
- Select the Financial Project Manager (F1) right
- Next:
- Option 1: In the Project OBS section, navigate to and select the appropriate OBS Node. The resulting projects displayed in the Projects section will reflect those projects in the selected OBS Node. Only one OBS Node can be selected at a time, so repeat this step for additional OBS Nodes. This approach enables the User to grant Financial Project Manager (F1) permissions to all existing projects plus future projects added to the OBS Node(s) selected.
- Option 2: The check box Filter based on Project Data is used when you need to grant this right based on a specific subset of projects that you have already selected on the Project Data page. In other words, you will have used either the master funnel filter located in the blue ribbon at the top of the screen and/or applied column filters on the Project Data page. The resulting projects displayed in the Projects section on the Rights screen will reflect those projects that appear on the filtered Project Data page. Select the project(s) for which the right needs to be granted.
- Option 3: If selecting only one or a few projects is desired from the filter result set created by Options 1 and/or 2, go directly to the Projects section and select the project(s) for which the right needs to be granted.
- Once the projects are identified, press the right arrow to move the Rights over to the Rights section.
FINANCIAL EDIT (F2)
- Enables edit of financial data on the specific OBS Nodes identified when granting this right. This right can be applied against either the Project OBS or the Resource OBS.
- Enables executing the Post Labor Costs on the project workspace>Financials page.
- Right is applied to a Resource OBS Node or Project OBS Node depending upon your business practice. (Note: A setting in your License Key determines which OBS appears below the Rights pane, and therefore which OBS is used for granting Financial Rights). See License Keys and Codes – Appended Letters for more.
FINANCIAL ADMINISTRATOR (F3)
- The Financial Administrator right grants all the functionality of Financial Edit, plus additional privileges that can be configured by your System Administrator.
- Right is applied to a Resource OBS Node or Project OBS Node depending upon your business practice. (Note: A setting in your License Key determines which OBS appears below the Rights pane, and therefore which OBS is used for granting Financial Rights). See License Keys and Codes – Appended Letters for more.
RATE READ ONLY (FR0)
- Enables view only of the Cost Rate field/column. Applies to the data columns in the project/resource/financial views.
- Right is applied to a Resource OBS Node
RATE EDIT (FR2)
- Enables view and edit of the User Rate field/column via the Edit Rates option under Administration. This option only appears if the user also has R3 rights.
- Right is applied to a Resource OBS Node
TIMESHEET APPROVAL (T0)
- Enables the user to approve timesheets for individual resources.
- Note: The User being granted this right needs to also be set up as a resource on the Resource Data page, with the “Key ID” field containing their User ID. This associates the Resource to its equivalent User, so that when the user logs in, he or she will see a Timesheet Actuals (Track) icon. Only Resources will see that icon, which is where timesheets are entered, approved, and managed. Thus, anyone entering a timesheet must also have a Resource associated with their User ID.
- Right applies to individual resources
TIMESHEET APPROVAL (T1)
- This right identifies the OBS Node level for timesheet approval (this is essentially the same as T0, except at the node level instead of individual resources). The resource will then be able to approve direct reports up to their OBS Node. The same rules as stated for T0 apply.
- Right is applied to a Resource OBS Node
TIMESHEET AUTO (T2)
- This right enables timesheet auto-approval on behalf of the User (Approver) being given this right. This Right applies to specifically named resources. For example: Either the generic User, Admin, or an assigned super user is granted the Timesheet Auto (T2) right and then specifically named resources are selected in the Resource section. The timesheets for those specific resources will be automatically approved by the system on behalf of the User with the T2 rights over those Resources.
- Recommendation: Select either the generic User, Admin,or an assigned “super user” to grant this right to.
- Right applies to individual resources.
TIMESHEET AUTO (T3)
- This right enables timesheet auto-approval on behalf of the User (Approver) being given this right. This is essentially the same as T2, except this applies to an OBS Node. For example: OBS Node Quality Assurance Dept is selected. The result is all resources associated with the Quality Assurance Dept will have their timesheets auto-approved by the system on behalf of the User with T3 rights to that Node.
- Recommendation: Select either the generic User, Admin, or an assigned super user to grant this right to.
- Right is applied to a Resource OBS Node
Admin>Server Settings that Reference Rights
A collection of System Settings references a User’s rights level as one method for granting access to various features/capabilities. This is in Admin>Server Settings.
Server Settings Page: Configurations for Approve, Add, and Delete
Access this page from Admin>Server Settings. Several feature/functionality aspects are granted through a combination of Rights given and Server Settings configurations made.
In the screen shot of the Server Settings page below, you see this for:
- PMO Access Level
- Project Initiation Approval
- Project Add
- Project Delete
- Resource Delete
- Assignment Delete
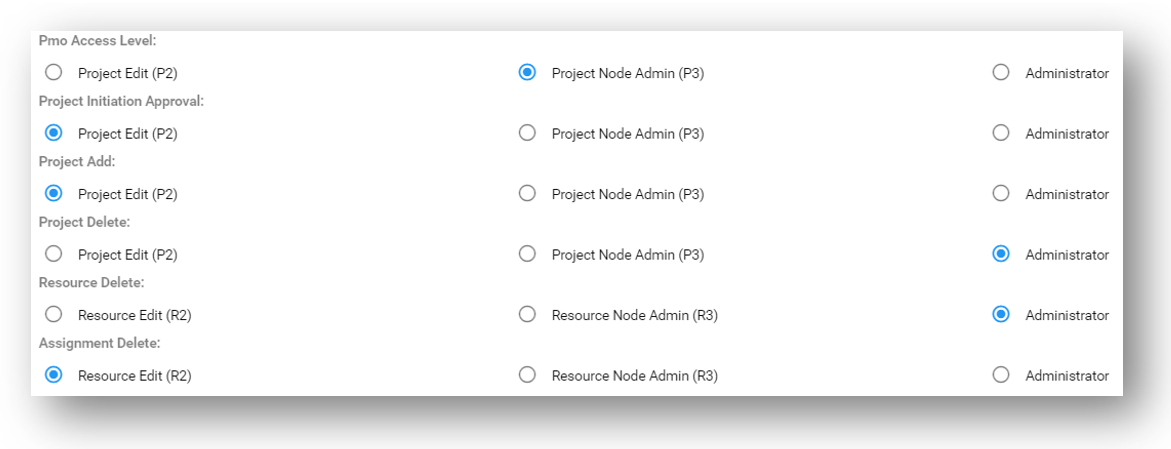
Important note: The configuration settings seen in the screen shot above are for illustrative purposes only. Your company’s configurations may vary.
There is a two-step administration configuration process to enable these features/functionality of object records:
- Step 1: On the Server Settings page, configure the following rights levels to the User:
- For deleting resource records: R2 or R3 or Admin
- For deleting project records: P2 or P3 or Admin
- For deleting assignment records: R2 or R3 or Admin
- Step 2: Navigate to Admin>Rights. Next, grant the appropriate Rights to the Users based on your organization’s business practices.
Field specific Rights – Hide and Edit
Access this page from Admin>Column Headings.
These setting respect the OBS node rights while further restricting view and/or edit capabilities of various feature/functions, but this time at the field level.
Note there are three View Types in which these permissions can be set at the field level: Resource and Project and Financial.
Field specific Rights are enabled through a two-step process:
- Step 1: Configure the access permissions on the Admin>Column Headings page
-
- When you land on the Admin>Column Headings page, first select which object’s fields you will configure: Resource or Project or Assignment.
- Next, in the Hide and/or Edit columns, select the appropriate field to support your business processes.
- Press Save!
- Step 2: Grant Users the permissions that act as a key to enable the field specific rights configurations
- Note: The next time the logs in the permissions will take effect.
Hide Right
If blank, a User has access to this field as long as the User’s rights grant them access to the object.
If a right level is identified, Users with the minimum of that right level will have access to the field. For example, if the right P1 (Project Manager) is identified for the Status field, then Users with P1, P2, and P3 [test this] will have access to this field where Users with P0 will not.
Edit Right
If blank, a User can edit this field as long as the User’s rights grant them access to the object and the right enables general editing.
If a right level is identified, Users with the minimum of that right level will have ability to edit the field. For example, if the right P3 (Project Administrator) is identified for the Status field, then Users with P3 [test this] will have edit capabilities to this field where Users with P0, P1, and P2 will not.
Allow Resource Managers to Assign Rights to their Users
ResourceFirst has the capability for a User to assign the same level of rights or lesser as they have to others in their OBS node.
Two coordinated configurations are required to enable this feature:
- In Admin>Server Settings> select Allow Managers to Assign Rights to their Users. IMPORTANT: After placing the check into the box, save your update by clicking Save button at the bottom of the Server Settings page.
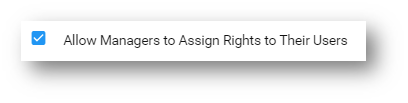
2. The person who needs this capability needs to be granted Resource Administrator (R3) rights that are associated with the OBS node(s) where the people who would be granted these rights are located.
When the Resource Manager would like to Grant Rights to Others
To grant the permissions, navigate to the drop down list to the right of your profile picture in the upper right of the page. Select the Assign Rights in the drop down (see screen shot below.) This link takes you to the Rights page. You will only see users in node(s) you’re authorized to see. You can assign rights up to the level of rights you have. Conversely, if you don’t have P3 rights, for example, you can’t grant someone P3 rights. For assistance on how to grant rights, refer to the section: Steps to Grant and Rescind Rights
