Administration Settings
This article explores the Settings menu, which includes configuration items such as system defaults, timesheet settings, color thresholds, report settings, and more.
Overview
Many default/configuration features are controlled in the Settings section of Administration, including system defaults (such as session timeout and page row count), portfolio and feature settings, time tracking settings, thresholds for demand and forecast color coding, the Allocation Algorithm, and report server settings.
Note: All the pages under settings have a non-standard method for saving changes and for reloading the page. Rather than Relad and Save icons at the top of the page, Settings pages have two buttons at the bottom right of the page, Reset and Save.

To access the Settings menu, go to Administration>Settings.

Portfolio
Projects

Right to Create – the level of authority required to create projects
Right to Delete – the level of authority required to delete projects
Right to Submit Status – the level of authority required to see/click the Submit Status button on project forms
Right to Copy Project – the level of authority required to copy projects to new or existing projects
Right to Approve Initiation – the level of authority required to approve initiation projects
Filter Project Initiation List by Manager – If checked AND a target project manager is saved in the Manager field of a submitted project initiation form, then the submitted initiation will only appear in that person’s initiation list. In this case, the “target project manager” makes the approve/reject decision rather than those that have the standard rights to do so. If unchecked, the user will see all submitted projects they have the rights to approve.
Drill Down to Project Details After Create – If checked, automatically drill down to the Project Detail page after creating a project. This will allow for entering additional details on the project info form (s).
Require Comment to Project Saves – – If checked, requires the user to enter a comment whenever saving a project
Resources

Right to Delete – the level of authority required to delete resources
Allow Managers to Assign Rights to Their Users – If checked, then any manager with R3 (Node Administrator) rights will see the Assign Rights option under their user profile. This enables them to assign rights to users in nodes the manager has R3 rights to. Managers can only assign rights to the level they themselves have.
Assignments

Right to Delete -The level of authority required to delete assignments
Minimum Org Level Depth – The minimum level in the Resource OBS where labor assignments can be created.
New Request Types Project Managers Can Create – The types of labor assignment requests project managers can create

Force Assignments to Leaf Projects Only – If checked, then assignments will only be allowed at the lowest leaf Resource OBS level in an OBS branch.
Split Assignment on Change – If checked, then if core attributes (such as Effort State, Cost Category, Location, Country, or Required Skill) on an assignment row are changed, the system will create a new assignment row with the changes, leaving the old assignment intact. All forecast demand in periods after the period containing the current date is moved to the new row.
Enable Actual Edit on Views – If checked, actuals can be modified on Assignment pages. If not checked, the actuals shown are read only.
Lock labor assignments for Project Managers – If checked, PMs cannot create or modify labor assignments. If not checked, they can create or modify the assignment types specified in New Request Types Project Managers Can Create above.
Financials

Minimum Financial Org Level Depth – The minimum level in the OBS hierarchy (resource or cost center OBS, depending on configuration) where financial assignments can be created.
Lock Financial Labor Assignments – If checked, labor assignments cannot be created or modified on financial assignment pages.
Features
General

Top Bar Color – Allows you to change the color of the top bar in ResourceFirst
Session Timeout – In minutes, how long the system should wait before timing out a user’s session
Maximum Days for Delegate Rights – Users can delegate their rights to others for a period of time (for instance if they are on leave). Here you can set the maximum time window (number of days in a row) a user can delegate their rights to someone else for.
Enable Teams – Allows Team assignment functionality to be used.
Enable Agile – Allows Agile functionality to be used.
Enable Asset – Allows Asset assignment functionality to be used.
Requests

Enable Request Functionality – Enables Request labor assignments (Skill or Resource) on the Assignment pages.
Auto Approve All Requests – Requests are automatically approved. (The Resource Manager doesn’t have to approve each request.)
[Note: This is conditional depending on the selection in the Auto Approve For drop-down below.]
Auto Approve For – Specifies the minimum project right level for users whose requests are auto-approved.
[Note: This setting has no effect unless Auto Approve All Requests is checked.]
Waterline Extra Fields

Field Name – Selected additional project fields are added to the right of the action fields on the Waterline pages (Exclude, Delay, Scale %).
Click the + dropdown and select fields as desired; the order of selection defines the column left to right order.
Import

Import Financial Assignment Actuals Only – If checked, users cannot import forecasts.
Algorithms
ResourceFirst allocation and utilization analysis colors and algorithms are fully configurable, as described below. See the article Allocation Analysis for more detail on this feature.
Allocation and Utilization Colors
The Project>Demand page and all Labor assignment pages provide color highlighting for resource supply-demand issues.
The Resource>Utilization page provides highlighting for over- and under-utilization issues.
The threshold percent numbers for each color can be set in the color bar for each color.

Project Allocation Colors: Apply to the Project>Demand page – sum of allocation to all project assignments divided by the sum of all project assignment demand = project allocation percent.
Assignment Allocation Colors: Apply to Labor Assignment pages – for each assignment period, allocation of unused resource capacity divided by assignment period demand = allocation percent.
Resource Utilization Colors: Apply to the Resource>Utilization page – total of all named resource assignment demand for a resource divided by resource capacity in each period = utilization percent
Allocation Algorithm (Optimization)
The ResourceFirst resource supply-demand analysis feature is driven by an algorithm that processes all labor assignments in a defined order. The algorithm is configurable by a ResourceFirst administrator. The default order of allocation ls:
Effort State If “Allocate Committed First” is checked in the Assignments page Options menu, the assignments with Effort States flagged as “commit first” (in Administration > Other > Assignment States) are allocated first.
Project Unit Priority – If “Allocate Committed First” is NOT checked in the Assignments page Options menu, then allocation within each Effort State value is in project unit priority order.
Project Name – Alphabetical by project name; assignments of the same Effort State and Unit Priority are allocated in project name order – project “Aardvark” before project “Zebra”.
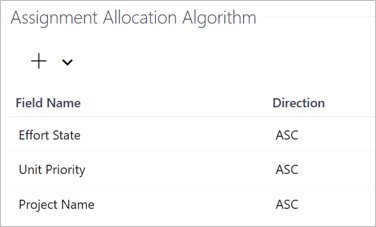
Click the + dropdown to add Additional fields to the Allocation Algorithm.

Note: It is best to review this with your PDWare representative to discuss the implications of any changes.
To delete a field from the algorithm, click on the field in the algorithm and click the trash can icon to the right.

Financial Labor Algorithm
The Financial Labor Algorithm determines how labor costs for projects are to be summarized into labor cost financial assignments on project Financial pages.
Given the algorithm in the screenshot below, the calculation summarizes the labor cost of all labor assignments with the same values in labor assignment fields project ID (PID), Assignment OBS, and A(ssignment)CostCategory into a single financial assignment.

If “Use Financial Labor Algorithm” is checked, labor costs are automatically posted (using the algorithm) to all Financial Assignments pages.
If unchecked the user must activate the Project Detail Financials page for a project and click the Post Labor Costs button, which calculates labor cost financial assignments for the selected project only.
Click the Add (+) button to add new fields to the summary rollup calculation algorithm.
To delete a field, click anywhere on the field row and click the trash can icon to the right.
For more about using automatic or manual Financial labor updates, see the article Displaying Labor Cost on Financial Pages.
Time Tracking
![]()
Time Tracking In – Enables time tracking to be done in hours, FTEs, or both.
Max Hours Per Period – Sets the maximum hours in a day that can be entered in a timesheet.
Min Hours Per Period – Sets the minimum hours in a day that can be entered in a timesheet.
Hours Per 1 Day FTE – Sets the number of hours per day for 1 Full Time Equivalent (FTE) resource.
Exclude Weekends – Does not show weekends in timesheets.
Exclude Inactive Resources from Compliance – Suppresses compliance alerts for inactive resources.
This is useful if someone is away for an extended period, or for resources who have left the organization but are still in the system as inactive.
Allow Project Managers to Approve/Reject Hours Tracked to Their Projects – Ditto.
Timesheet Add Options
Add Assignment
Add Task
Add Overhead
Qlikview
Reporting Server settings are part of the technical installation of the application, which PDWare will guide you through.
Contact your PDWare consultant or PDWare Support for details.

Links
Specify links for your organizations privacy and/or cookie policies on this page.
Links specified here appear under the main Information menu (the ? icon), where the Help function is, in the upper right of the ResourceFirst screen.

Saving Your Changes
Once your settings have been updated, remember to click the Save button at the bottom right of the page.
Note that you can reset your settings to the factory settings via the Reset button. Use extreme caution in doing this.